
Did you get the family project to do a book character pumpkin? We did! I think I was a little more excited than I needed to be for this project. I remember having pumpkin decorating contests in school when I was a kid. While this wasn’t a contest, it was a mandatory 1st grade family assignment.
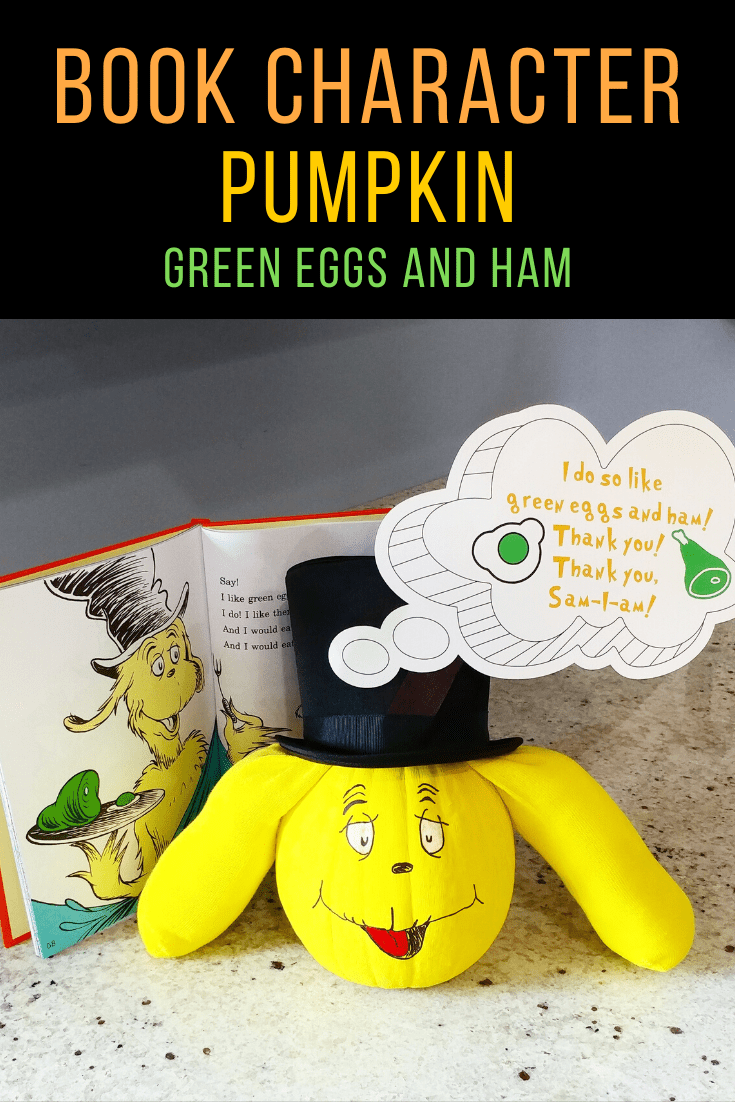
JP picked the Dr. Seuss book Green Eggs & Ham and the yellow dog character. Is that a dog? I never really paid that much attention to try and identify it until I had to figure out how we were going to decorate a pumpkin to look like it. I think it is a dog. He was very specific, the pumpkin was not to be Dr. Seuss/Cat in the Hat, it needed to be the dog.

What’s the first thing most people do these days when a project like this comes up? PINTEREST! When I searched for book character pumpkin projects nothing came up. I got very creative with my searches in Google as well trying to find something for inspiration. Would you believe there were no ideas for this dog character? There were some general Green Eggs & Ham, but not the actual character.
Supplies
I wandered Michaels and that left me no where so then I wandered the Spirit Halloween store. That’s were I found the mini top hat and I saw a pair of yellow tights and that gave me the idea for the ears. I got a cheap pair of yellow socks to use for the ears and stuffed them with pillow stuffing.
The dog is not necessarily a ‘recognizable’ character so I wanted to make sure to add a quote from the book. The book had to go to school with the pumpkin but making it with the print to cut feature of the Cricut was pretty quick and easy.
To paint the pumpkin use acrylic paint and a paint brush. For attaching the ears and hat use straight pins. I also attached the speech bubble to a large Popsicle stick that I used black sharpie on to blend it in with the hat. Use black ribbon to help attach and hide it as well.

Paint the Book Character Pumpkin
First of all you need to paint the pumpkin. Ours had multiple coats because JP did do this but my control side needed to make sure it was all even. Just make sure it’s dry before starting a new coat.
Draw the face on with a pencil so any touch ups cover a little easier. I used sharpie paint markers from my craft stash to draw and color the face.
Ears
The next step is to add the ears. Stuff your socks. You could use tissue paper, newspaper, batting/stuffing or anything to give it some fluff. I left a short stub of the stem on the pumpkin. If the socks are extra long just drape them over the top of the stem to figure out where to cut them off. Also to gauge how much to stuff them. You don’t want too much bulk under the hat. I just used a straight pin to attach the socks to the stem.

Speech Bubble
Next, I added the speech bubble to the hat. I colored the part of the stick that was going to show with black sharpie. I just used masking tape to attach the bubble to the stick, nothing fancy.
To attach it to the hat I did push a pin through the stick in front. This did not keep it still. It still moves around but gave a little more stability from falling out. To cover it I wrapped the hat in black ribbon and that’s what keeps it in place. I pinned one end of the ribbon in the back through the hat and then wrapped it tightly so the stick was in place. Then pinned the other end of the ribbon in the back. That is hard to explain but hopefully a visual of the front will help it make sense.

Hat
Finally, attach the hat. This will all be adjusted depending on the size of your hat and pumpkin. I figured out the angle and position and used a straight pin on both sides. I got it in the seam of the hat as close as possible and it’s barely visible in the picture. One pin on each side was very stable.

Completed Book Character Pumpkin

I will start to do more tutorials as I know seeing more details on ‘how’ is very helpful for some. Until then you can browse through some of these:
1. How to make a Christmas Countdown with kids activities
2. Shirt Making – Simple Steps Anyone Can Do
3. The Low Down on Reverse Canvas

Leave a comment